Saturday, September 29, 2012

Design Tuto Installiong Action In Photoshop Elements

Installiong Action In Photoshop Elements

INSTALLING ACTIONS IN PHOTOSHOP ELEMENTS

It is important to note that not all actions will work in Elements. The reason is that actions cannot be created in Elements. They can only be created in versions 7 and higher. Because of this, some of the functions that are available in the higher versions (such as levels and curves) are not available in all versions of PS Elements. Also, PS Elements has the placement of some of the same functions in a different spot than in the higher versions. So before you spend any money on buying action sets, it is best to inquire if the actions will even work in PS Elements.

LOADING ACTIONS IN PS ELEMENTS 2, 3 and 4:

1. If Elements is open, please close it.
2. Place the entire action folder into your PSE effects folder. It will look like: c:\Program Files\Adobe\Photoshop Elements 3.0\Previews\Effects Folder
3. To reset your action list and add the new effect you just installed, you will first need to delete the files named:
CategoryCache.che
ListCache.che
ThumbNailCache.che
You must delete these from both the Effects Cache subfolder and the Filters Cache subfolder.
4. Now you can launch the Elements program. Click on the Styles & Effects palette. Then click on Effects. You will see it building the image of the action you just installed.
5. Your actions are now ready to use.

INSTALLING ACTIONS IN PHOTOSHOP ELEMENTS 5

Just bung them into C:\documents and settings\all users\application data\Adobe\Photoshop Elements\5.0\Photo Creations\Special Effects\Photo Effects. You may need to experiment a
little with folders/no folders in there. No cache deletion needed now. (Just so you know, the "application data" part of this path is hidden. I actually had to type the pathname into my file browser. You can't just point and click to get there.) Rename each of the thumbnail images (.psd files) to thumbs.psd so that your thumbnail image will show up in your effects palette.

USING ACTIONS IN PHOTOSOP ELEMENTS 2, 3, 4 and 5:

1. Open up the photo you want to enhance.
2. Make a duplicate copy of your photo and turn off the bottom layer (this is in case you don't like the action effect - you can just discard the top layer and resume with the original).
3. Select the top photo.
4. Go to your "Styles and Effects" window and set it to show "Effects" and "All". You should see the icon for the effect you just installed. It will be a copy of the PSD file included in the folder here.
5. Double click it.
6. Voila!!
Read More ...
Tuesday, September 18, 2012

Adding Texture to Your Image For Photoshop

Adding Texture to Your Image For Photoshop CS

Adding Texture to Your Image For Photoshop
Adding texture can bring your images to a different level, adding interest, depth, and a bit of artistic quality to them. Photoshop comes preloaded with lots of different textures to choose from, or you can take your own images and use them for textures in much the same way. There are a few different ways to add texture, but I’m just going to show you one way for now.
First, open up the image you want to alter. Resize the image to whatever works for you. If you are printing your image, be sure to size it at 300 dpi to get good overall print quality. I’m working with a stock photo that I popped the color on a bit. I recommend doing all of your exposure and color compensations first, then doing the texture last.
With your image open, go up to the options bar and click on LAYER > NEW FILL LAYER > PATTERN.

Adding Texture to Your Image For Photoshop
A window will open up saying “New Layer”. Just go ahead and click OK.

Adding Texture to Your Image For Photoshop

Now another pop-up window will open and you will see a pattern placed over the top of your image. Grab the drop-down menu on the left and select the pattern you want to use. I’m choosing canvas which is a default texture that comes preloaded in PhotoShop.

Adding Texture to Your Image For Photoshop

At this point, you can make the pattern bigger or smaller by increasing the percentage on the SCALE section within this same window. I’m just going to leave mine set to the default of 100% and then click OK.

Now you need to go to your layers palette and change the blending mode.

Adding Texture to Your Image For Photoshop
Since each pattern you choose will affect your photos differently, I recommend scrolling through all of the blending modes til you find the one you like best. For this image, I am using to use the HARD LIGHT blending mode. But you may prefer soft light or overlay, or one of the many others there are to choose from.
As you can see in the sample above, the texture is very intense. I think it is way too much for my personal taste, so I’m going to reduce the opacity of the Pattern Fill 1 layer to 50%. As you can see, it is much softer looking now.
Adding Texture to Your Image For Photoshop


When you are all done, simply merge the layers together and save it as a new document. Here is my final before and after of this image with the canvas texture. Have fun playing!!

Adding Texture to Your Image For Photoshop


Read More ...
Wednesday, September 5, 2012

Tutorial Change Eye Color For Photoshop

Change Eye Color For Photoshop Tutorial

This tutorial will teach you how to change the color of your subject’s eyes (or shirt, or hair, etc.). This tutorial is done in PhotoShop CS2, but it should be fairly compatible to any of the PhotoShop programs, including PS Elements. First, select the image you want to alter and open it up. Here’s my starting image:

Change Eye Color For Photoshop
As always, in Photoshop there are several ways to accomplish the task. You could use a quick mask on the area you wish to adjust the color, or you can use an inverted layer mask, or you can do it some other way I’m sure. LOL I’m going to show you using an inverted layer mask. So, let’s first create the color adjustment layer. Go to your layers palette and click on the half-moon icon at the bottom of the palette, and then choose Hue/Saturation.

Change Eye Color For Photoshop

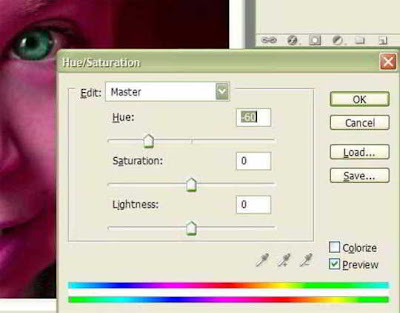
A new window will pop open giving you the option to change the hue, saturation, and lightness. Slide the HUE adjustment to the left or right until you find a color that you like. If it is too bright, you can lower the saturation by moving that slider to the left. If it is too dark or light, you can then slide the lightness slider (left makes it darker, right makes it lighter).

Don’t freak out when you see your entire image changing color. Just pay attention to what the eyes look like. As you can see below, I changed this one to green eyes.

Change Eye Color For Photoshop

Now we will invert the layer mask that is located to the right of the hue/adjustment layer. It’s that white box linked to the layer.

Change Eye Color For Photoshop

To invert it, press CONTROL-I on your keyboard. The mask will now be black and your image will look normal again. The reason we’re doing this is so that we can “paint on” the color change only where we want it.

Change Eye Color For Photoshop

When working with layer masks, you need to paint in black and white only. If your mask is white, the paint you need to use is black. If your mask is black, then you need to paint with white. We are using the mask to reveal the color change only on the eyes (or wherever you decide you need it).

So go to your tool box and make your foreground color white. You can reset the colors by clicking on the mini image


Now you will need to get your paint brush and adjust the size to fit your image. The paint brush is located in the tool box. Once you choose a brush, you can then click on the little black arrow up in the options bar at the top of the screen and adjust the size and softness of the brush.

Change Eye Color For Photoshop

Now go back to your layers palette and make sure your black inverted mask is selected by clicking directly on the mask. Then go to your image, zoom in closely on the first eye and begin painting with white paint on the colored portion of the eyes. You will be revealing the new eye color as you paint.

Change Eye Color For Photoshop

If you make a mistake and paint outside the eye area, you can simply change your paint color to black and paint back over the mistake to reveal the correct color.
When you are done with the first eye, move to the other eye and repeat the painting with the white paint color and soft brush. Here is my before and after:

Change Eye Color For Photoshop

Thanx..
Read More ...