Change Eye Color For Photoshop Tutorial
This tutorial will teach you how to change the color of your subject’s eyes (or shirt, or hair, etc.). This tutorial is done in PhotoShop CS2, but it should be fairly compatible to any of the PhotoShop programs, including PS Elements. First, select the image you want to alter and open it up. Here’s my starting image:
As always, in Photoshop there are several ways to accomplish the task. You could use a quick mask on the area you wish to adjust the color, or you can use an inverted layer mask, or you can do it some other way I’m sure. LOL I’m going to show you using an inverted layer mask. So, let’s first create the color adjustment layer. Go to your layers palette and click on the half-moon icon at the bottom of the palette, and then choose Hue/Saturation.
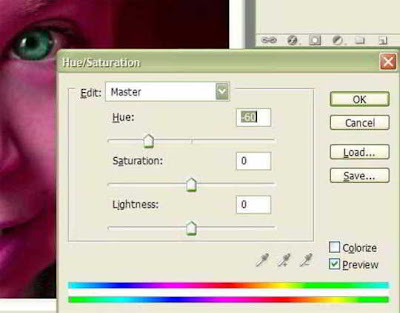
A new window will pop open giving you the option to change the hue, saturation, and lightness. Slide the HUE adjustment to the left or right until you find a color that you like. If it is too bright, you can lower the saturation by moving that slider to the left. If it is too dark or light, you can then slide the lightness slider (left makes it darker, right makes it lighter).
Don’t freak out when you see your entire image changing color. Just pay attention to what the eyes look like. As you can see below, I changed this one to green eyes.
Now we will invert the layer mask that is located to the right of the hue/adjustment layer. It’s that white box linked to the layer.
To invert it, press CONTROL-I on your keyboard. The mask will now be black and your image will look normal again. The reason we’re doing this is so that we can “paint on” the color change only where we want it.
When working with layer masks, you need to paint in black and white only. If your mask is white, the paint you need to use is black. If your mask is black, then you need to paint with white. We are using the mask to reveal the color change only on the eyes (or wherever you decide you need it).
So go to your tool box and make your foreground color white. You can reset the colors by clicking on the mini image
Now you will need to get your paint brush and adjust the size to fit your image. The paint brush is located in the tool box. Once you choose a brush, you can then click on the little black arrow up in the options bar at the top of the screen and adjust the size and softness of the brush.
If you make a mistake and paint outside the eye area, you can simply change your paint color to black and paint back over the mistake to reveal the correct color.
When you are done with the first eye, move to the other eye and repeat the painting with the white paint color and soft brush. Here is my before and after:
Thanx..


No comments:
Post a Comment